First a pre-word. Don’t change too many things at once without testing in between as you will not be able to quickly identify what has caused the problem.  But of course we all know this 🙂

The Config

  • Hyper-V virtual machine
  • 3CX self-hosted enterprise server
  • Zen Internet SIP connection/Leased Line
  • Smoothwall Firewall

The Background

Having spent the last few months with a test 3CX PBX installation and happy that everything was working it was time to move the PBX to the voice VLAN.  After my last dial test and before reconfiguring the VLAN I added all the existing DDI’s to the phone system, more in preparation than anything else, I hadn’t yet ported our numbers.  I also made some changes to emergency number configuration as well as outbound call rules.

Once I had reconfigured the VM and telephones for the voice VLAN, confirmed phones had registered and that the appropriate port forwards had been updated to the new IP on the firewall I performed a test call.

I received the following error:

3CX Call or Registration has failed: 404 Not Found

The usual internet searching and my logic of “it worked before” meant I undid everything I had done after my final successful call test and the VLAN change – but leaving the VLAN change in place.

Still the same error.

I then undid the VLAN configuration change.  Same error.  Flummoxed and with zero meaningful results from Google and the 3CX forums.  I called Zen Internet.

The engineer on the phone was very helpful and pointed out this is probably the most common problem he comes across with failed SIP calls using 3CX.

The Solution

In short.  The outbound CID needs to match the username in the SIP Trunk connection.  Somehow when I added the additional DID’s one of the numbers was taken on as the Default CID.  No idea why, it wasn’t something I had manually configured – as far as I can remember.

In 3CX Management Dashboard under SIP Trunks double click your SIP trunk.  On the General tab under the Authentication section make a note (or select and copy) the Authentication ID then under the Caller ID tab the Configure Outbound Caller ID should be the same.  If it isn’t make sure it is then click OK.

You should now find that the calls go through without any problems J


I’ve been having an issue with an ASUS All-in-one unit where the DVD drive would not function correctly after an upgrade or clean installation of Windows 10.  This particular model is the ET2321IUTH

After numerous conversations with ASUS regarding this (and other) issues they simply advised the hardware was not supported using Windows 10 – this despite them offering “some” Windows 10 drivers on their website for this particular model.

Anyway.  The drive in question is a Matsui drive.  If you put media in the drive it will whizz and wirl a little but never actually show you what’s on the disk.  If you reboot, the drive will correctly initialise and the media will then function within the Windows environment.  Until you want to swap the media.  Then another full reboot is required.

PROBLEM SOLVED!

Download the SATA – SetupRST_13.2.4.100_x64.zip file in Step 1 below and using Device Manager update the installed default Windows/Microsoft driver with the one in this zip file.

Steps:

  1. Download the drivers from here: https://onedrive.live.com/redir?resid=BEA61E36C95431C3!108&authkey=!AFiHYLh5xAFH3Ac&ithint=file%2czip (this is my personal OneDrive not someone elses)
  2. Right Click Start Button select Device Manager
  3. Expand DVD/CD-ROM Drives
  4. Right click the drive in question and select Update Driver Software
  5. Select Browse my computer for driver software
  6. Click Let me pick from a list of device drivers on my computer
  7. Click Have Disk
  8. Browse to the location of the extracted zip file and complete the wizard.
  9. A reboot may be required but you should then find your optical drive works.

I have only tested this with the device listed above.  I am sure it will work on others with similar drives/problems.

I had an issue today that was rather vexing.  I had to perform an erase followed by an internet repair of a MacBook Air.  After an hour or so of being told the system could not download the required files I finally realised this was due to the proxy server the MacBook Air was behind.

I’d joined the device to the guest wireless network but failed to receive the portal authentication page box that this wireless requires to perform security checks.  Joining to the other wireless network requires a proxy to be entered.

How do I do this using the repair console for Mac OS X Lion?  Apple helpdesk told me to go to another wireless network that didn’t require a proxy.  That’s not helpful in this situation as it means using a slower internet connection, and waiting around 8 hours before I am at the alternative location.

Surely there must be a way??

Thankfully, there was.  Using the terminal bash interface from the recovery menu I simply enter the command networksetup –setwebproxy “wi-fi” myproxy.example.com 8080

In this example “wi-fi” is the name of the network connection, this would need to be changed if using the Ethernet and myproxy.example.com 8080 is the proxy name or IP address followed by a space and the proxy port number.  Note the absence of a : (colon) between the proxy and the port number.

Download of additional components from the internet now functioning as expected.

2012 in review

Posted: December 30, 2012 in Exchange Server

The WordPress.com stats helper monkeys prepared a 2012 annual report for this blog.

Here’s an excerpt:

About 55,000 tourists visit Liechtenstein every year. This blog was viewed about 240,000 times in 2012. If it were Liechtenstein, it would take about 4 years for that many people to see it. Your blog had more visits than a small country in Europe!

Click here to see the complete report.

It’s a sad day…..my blind faith in LG Electronics has been tarnished!

I’ve loved LG equipment for years. Every time I’ve replaced an optical drive its been with an LG drive, I’m on to my second LG washing machine and I’m on to my 4th Generation of LG monitors.

The Blu-Ray player in the lounge is LG and after a major fallout with Sky, who are no longer going to be receiving £50 of my money every month, I decided to go down the Freeview route.

My love of LG I didn’t even look anywhere else, I knew what I wanted and that seemed to be presented in the form of the LG HR650 which is a dual tuner Freeview player with 500GB hard disk and a 3D Blu-Ray player. But not only that. It has built in wifi which gives access to web based video resources as well. Sounds awesome…..I bought one.

That was Thursday. It’s now Monday and it’s going back tomorrow. It would be going back today if it hadn’t been a bank holiday!

It’s awful! It jumps, so if you are watching someone running they pretty much skip across the screen because of the missed frames.

When someone is talking it looks like its been badly edited with pixels around the edge of their mouth.

Sounds like a signal problem? That’s what I thought….unfortunately not…Jonny English DVD was even worse….and I don’t mean the film!

And then…to make matters even worse….if they weren’t bad already….I setup to do some recording. It fails. I suspect because it pops up with a message asking you to confirm you actually want to record it. OF COURSE I DO! I ASKED YOU TO!

Sadly, this is not the end of my breakup with LG, it continues….it has crashed 3 or 4 times to the point where it’s needed to be starved of power to regain any sort of usability.

This is one very upset LG fan. Such is my fallout I haven’t even considered a replacement unit. It’s going back for a refund. I’ve ordered a Panasonic instead.

I have a large virtual desktop environment is a senior school. This is currently at 110 units with another 60 getting ready to go in.

One of the things I’d like to be able to offer the students and teachers is the ability to select between a Mac or Windows desktop. More for educational purposes than anything else.

For some reason Apple have decided that I can only run OSx Virtual Desktops on Mac hardware.

VMware have on their supported hardware list the XServer 3.1 which is no longer available.

I have a 6 cluster HP DL380 ESX setup, I don’t want a Mac server. But I want the ability to use Mac Virtual Machines.

I think this is very short sighted of Apple and is closing the door on a whole host of future Apple users.

Unless of course…there is information out there that isn’t readily available that explains how to achieve this? I reserve the right to be wrong 🙂

If I’m not wrong, and you are also looking for this functionality then lets vote here, post this page wherever you can and see if we can get noticed!

It’s a win win for Apple and us. They receive revenue for the licensing, a whole host of future apple users (I have 1800 students at the school where this would be used) and we get to show the students another OS, benefit from being able to use Apple only products and features.

What’s not to like?! Come on Apple!!! sort it out!!

Posted: April 7, 2012 in VMWare
Tags: , , ,

I’ve been meaning to write this post for a while now but somehow never found the time to do it.

When migrating from SBS2008 to SBS2011 I have come across this issue a number of times now and each time I seem to get caught up in the moment and try to find another way of resolving this issue.

Lot’s of posts about this being a 3rd party connector that has been setup for a photocopier or mail service of some sort etc etc.  None of which is correct.

It’s plain and simple, this is a foreign connector in SBS 2008, and contrary to other posts, it does seem to be there by default, I have checked vanilla SBS 2008 installs and those that have been migrated. I even installed a fresh SBS 2008 in to a virtual machine and it was there too.

This can be confirmed by launching the Exchange Management Shell and running Get-ForeignConnector and if you want more details run Get-ForeignConnector | fl

It’s also part of the Migration guide from SBS 2008 to SBS 2008.

It’s purpose…to receive email addressed to companyweb.  If you check the Exchange Management Console on an SBS 2008 server you will see it listed under Organisation Configuration > Hub Transport > Remote Domains you will see the Windows SBS Company Web Domain.  This is the matching address space.

The purpose…to drop any emails destined for companyweb to a folder ready for pickup by Sharepoint.  By Default this will be C:\Inetpub\mailroot\drop

This functionality is not available in SBS 2011 (or isn’t as far as I can tell) therefore before migration you will need to remove the foreign connector.

To do this, run the following command Remove-ForeignConnector –Identity “Windows SBS Company Web Connector SERVER2008” and then select Y at the confirmation prompt.

I found myself today in a situation where I hadn’t completely finished an installation of SBS2011 and wanted to finish it remotely.

Without really giving it too much thought I had convinced myself I could simply connect to the server remotely using RWW.

Unfortunately I hadn’t yet got around to installing a 3rd party trusted certificate, which kind of complicated the issue somewhat.  Upon connecting to RWW and clicking the connect button underneath the SBS server name I was rudely presented with this error.


Annoyed with myself for not doing enough so that I could complete this job and completely forgetting to install the CA certificate I searched for a way to resolve this.

Thankfully, I didn’t have to look too far.

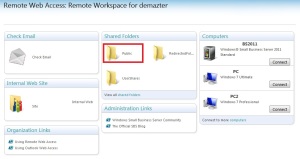
When connecting to RWW, listed under Shared Folders is the default Public Share as illustrated below.  Click this link, in the new window that opens select Public and then Downloads.  Under here you will see Install Certificate Package.zip put a check box next to this and then select download.

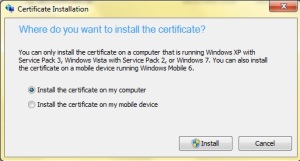
Once downloaded, extract the zip file and then launch the InstallCertificate.exe file.  Select Install Certificate on my computer and click install.

Once done, close and re-launch internet explorer and re-connect to RWW.  You will now find you can successfully connect to remote computers.

The other alternative is to purchase a 3rd party trusted certificate from http://www.exchangecertificates.com that will remove these certificate errors completely.

These days it’s not very often we see a company or service praised for such high standards, and it’s not very often we get high standard of customer care, communication and delivery of service all in one package. Well I am pleased to announce, there are still companies out there who pay attention to the needs of their customers to be informed, and to receive a high quality service that is good value.

One such company that I have come across recently is UK iPod Repairs. With the growing number of isomething devices in the home and business these days, it’s very often a week doesn’t go by when someone says “do you know a good place where I can get this fixed?” Well, the answer is yes, I cannot recommend this company more.

I placed an order online for the repair of a cracked iPhone 3GS screen. I’d seen the replacement screens you can buy online and fit yourself, but UK iPod Repairs were offering this service for £40 including return postage and packaging. They were boasting same day repairs and next day return delivery, of course, with any such claims there is always reticense as to whether they can deliver.

Well, I am very pleased to announce that they did deliver on every aspact of their service. The timeline is illustrated below.

  • Saturday, I posted my iPhone, special delivery guaranteed before 1pm on Monday, I wanted it insured having had some bad experiences with damaged goods recently.
  • Monday morning at 10:02 I receive an email confirming my phone had been received by UK iPod Repairs
  • Monday afternoon at 13:27 I received an email confirming my iPhone screen had been repaired and that I will be informed when it has been dispatched.
  • Monday afternoon at 17:02 I received a final email confirming my iPhone had been dispatched
  • Tuesday morning the postman knocks on the door with my iPhone, screen fully replaced with a very high standard of workmanship and fully working.

UK iPod Repairs, I thank you, for delivering a service that is lacking these days, and the service we all crave. Speedy, well communicated, and cost effective. I will certainly, no doubt, use you again in the future, especially as we have at least 5 idevices in our household and my customers have numerous themselves.

UK iPod Repairs full list of services can be found at http://www.ukipodrepairs.co.uk

Posted: August 10, 2011 in Uncategorized
Tags: , , , , , ,

Welcome to my series of short tips on migrations. Whilst based on Microsoft migrations the same principles can be applied to any type of migration.

My first tip Migration Tip #1 – Source Server Health can be found here: https://demazter.wordpress.com/2011/06/12/migration-tip-1-source-server-health/

My second tip Migration Tip #2 – The Practice Run can be found here: https://demazter.wordpress.com/2011/06/14/migration-tip-2-%e2%80%93-the-practice-run/

My third tip Migration Tip #3 – Preparing for Live Migration can be found here: https://demazter.wordpress.com/2011/06/15/migration-tip-3-preparing-for-live-migration/

My fourth top Migration Tip #4 – The Migration can be found here: https://demazter.wordpress.com/2011/06/16/migration-tip-4-the-migration/

My fifth tip is based around testing and clearing up after the migration.  You’ve done all the hardwork, it would be a real shame to get this far and to encounter problems when you start to remove the old system.

Check over your work, do some test shutdowns of the old system.  Making sure that all users, data and systems are all operational during the shutdown.  Even go as far as to turn the system off for a week before you actually remove it from the network.  Making sure you tell your users that you are doing this and that any glitches you want to know about.  Believe me, all too often they will put up with a glitch and won’t tell you about it, until it’s too late.  You need to make it very clear that no matter how small you need to know about it during this “down” time.  It’s easier to resolve when the system is available than it is when it’s no longer part of your network.

There may be additional tasks you will need to perform once the old system is decomissioned.  These could include (but are not limited to):

  • Backups, check you are backing up the data/system in it’s new location.
  • Data flow, check that any dataflow in, out and around your network/systems have been updated to accomodate the changes you have made.  for example if it’s an Exchange migration, make sure that the firewall rules that control mailflow have been updated.  If it’s a SQL Database, make sure that any scripts/log shipping/etc have been modified. 
  • Check any internal/external DNS entries have been modified if required.  If migrating to the cloud these will be external changes, if internal migrations then they will be internal changes.
  • Check that any systems that interact with what has been migrated are still functioning, MFD’s, Fax Machines, NAS  devices etc etc.  The list is endless and only you will know what devices/systems you have in place.  Check them all.
  • Check with your users that they are happy that all of what they need access to is working and functioning as they expect it to.
  • Update your network documentation, do this now, whilst it’s still fresh in your mind.

Finally, once all that has been completed and you are happy that everything is working, decomission the old system.  Making sure of course you take a final backup before you do so.  Make sure you follow the correct procedure for removing the system you are migrating away from.  Don’t just turn it off and take it away.  Not following the correct procedure, can and will effect your network and any future migrations.

This is my final migration tip, I hope you have found them useful.  Please watch out for my next migration guide which will be available in the next few weeks which is Migrating Small Business Server 2008 to Small Business Server 2011.

If you are planning on a migration and are not comfortable with the process then Demazter IT Services can assist you. Please contact me on glen@demazter.co.uk.

All versions of Microsoft Exchange and Small Business Server require the use of an SSL Certificate. Whilst they will quite happily use a self-signed certificate a commercial certificate can save a lot of time and hassle, purchase Exchange/SBS SSL Certificates at an excellent price from: http://www.exchangecertificates.com